Quick File Upload logo

Quick File Upload plugin

Insert links to uploaded files
QuickFileUpload screenshot
QuickFileUpload screenshotQuickFileUpload uploaded files screenshot
Quick File Upload logo

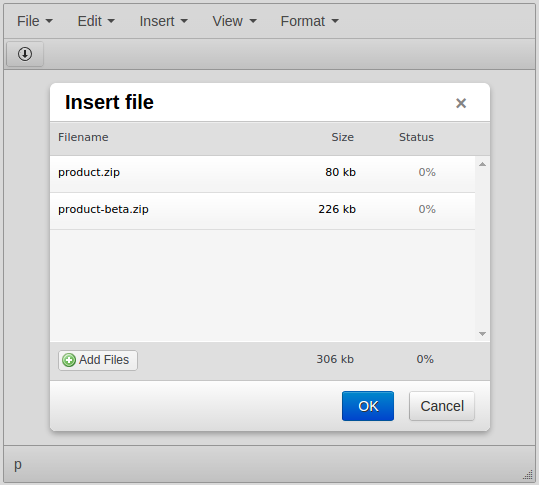
This plugin lets ability to your WYSIWYG editor to upload file or files and insert links to them with a couple of clicks.

User can insert links to uploaded files without using any web file managers. He just chooses file from his computer and they are inserted near cursor in TinyMCE.

Features:

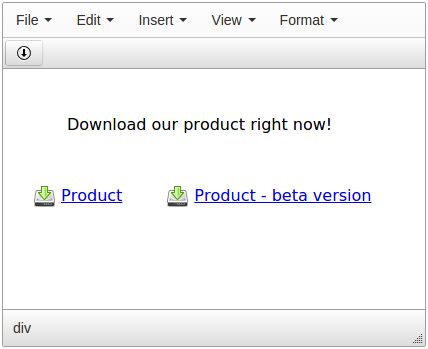
  • Quick inserting link to uploaded image
  • Multiple files upload
  • Ability to change picture (download icon) near the link
CKEditor 4 logo CKEditor 4
TinyMCE 6 logo TinyMCE 6
TinyMCE 5 logo TinyMCE 5
TinyMCE 4 logo TinyMCE 4

Install Quick File Upload plugin in CKEditor 4

Download Quick File Upload
ZIP archive of Quick File Upload for CKEditor 4

Then do these simple steps:

  1. Copy QuickFileUpload directory to ckeditor/plugins/.
  2. Edit CKEditor config and add QuickFileUpload to extraPlugins parameter.

All the buttons this plugin will add to your toolbar automatically.

Using config file
Using initialization script

Example of configuring with config.js

If you prefer to edit config.js config file of CKEditor or when your CKEditor initialization code is placed inside some non-editable part of CMS, make these changes there:

CKEDITOR.editorConfig = function(config) {
    config.extraPlugins = "QuickFileUpload";
};

Example of configuring inside initialization code

Some CMSs do not use config.js file and let to edit CKEditor initialization script only. Do this changes there:

CKEDITOR.replace("#editor", {
    extraPlugins: "QuickFileUpload",
});

Install Quick File Upload plugin in TinyMCE 6

Download Quick File Upload
ZIP archive of Quick File Upload for TinyMCE 6
Self-hosted TinyMCE 6
Cloud TinyMCE 6

Install the plugin to TinyMCE 6 hosted on your server

  1. Copy QuickFileUpload directory to tinymce/plugins/.
  2. Edit TinyMCE config and add QuickFileUpload to plugins parameter.

All the buttons this plugin will add to your toolbar automatically.

Example

Here you can see sample TinyMCE initialization code with config inside it:

TinyMCE.init({
    selector: "#editor",
    plugins: "QuickFileUpload",
});

Refer to TinyMCE add-ons installation manual for more details

Install the plugin to cloud edition of TinyMCE 6

  1. Copy QuickFileUpload directory somewhere on your server where it can be accessible by a link.
  2. Specify the location of just copied Quick File Upload plugin adding key-value pair in external_plugins TinyMCE config parameter.
  3. Edit TinyMCE config and add QuickFileUpload to plugins parameter.

All the buttons this plugin will add to your toolbar automatically.

Example

Here you can see sample cloud TinyMCE initialization code with config inside it:

TinyMCE.init({
    selector: "#editor",
    plugins: "QuickFileUpload",
    external_plugins: {
        "QuickFileUpload": "http://example.com/public/QuickFileUpload/plugin.min.js",
    },
});

Refer to TinyMCE add-ons installation manual for more details

Install Quick File Upload plugin in TinyMCE 5

Download Quick File Upload
ZIP archive of Quick File Upload for TinyMCE 5
Self-hosted TinyMCE 5
Cloud TinyMCE 5

Install the plugin to TinyMCE 5 hosted on your server

  1. Copy QuickFileUpload directory to tinymce/plugins/.
  2. Edit TinyMCE config and add QuickFileUpload to plugins parameter.

All the buttons this plugin will add to your toolbar automatically.

Example

Here you can see sample TinyMCE initialization code with config inside it:

TinyMCE.init({
    selector: "#editor",
    plugins: "QuickFileUpload",
});

Refer to TinyMCE add-ons installation manual for more details

Install the plugin to cloud edition of TinyMCE 5

  1. Copy QuickFileUpload directory somewhere on your server where it can be accessible by a link.
  2. Specify the location of just copied Quick File Upload plugin adding key-value pair in external_plugins TinyMCE config parameter.
  3. Edit TinyMCE config and add QuickFileUpload to plugins parameter.

All the buttons this plugin will add to your toolbar automatically.

Example

Here you can see sample cloud TinyMCE initialization code with config inside it:

TinyMCE.init({
    selector: "#editor",
    plugins: "QuickFileUpload",
    external_plugins: {
        "QuickFileUpload": "http://example.com/public/QuickFileUpload/plugin.min.js",
    },
});

Refer to TinyMCE add-ons installation manual for more details

Install Quick File Upload plugin in TinyMCE 4

Download Quick File Upload
ZIP archive of Quick File Upload for TinyMCE 4

Then do these simple steps:

  1. Copy QuickFileUpload directory to tinymce/plugins/.
  2. Edit TinyMCE config and add QuickFileUpload to plugins parameter.

All the buttons this plugin will add to your toolbar automatically.

Example

Here you can see sample TinyMCE initialization code with config inside it:

TinyMCE.init({
    selector: "#editor",
    plugins: "QuickFileUpload",
});

Refer to TinyMCE add-ons installation manual for more details

Reviews

Be the first who will write a feedback for this plugin.

Tell a friend about Quick File Upload

Send