Image Embed logo

Image Embed plugin

Embed images without uploading them onto a server (Base64 embedding)
Image Embed screenshot
Image Embed logo

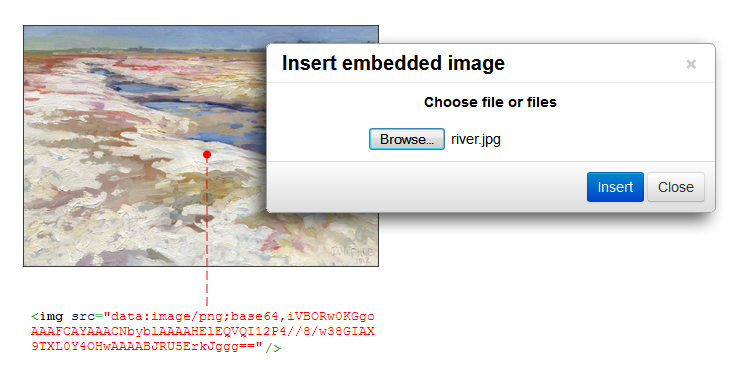
TinyMCE Image Embed is the tool for inserting (embedding) images into the document you edit without uploading files to server. It uses features available to all current versions of popular browsers.

Features:

  • Multiple images uploading
  • Support of different image formats
  • No server part is required
  • Immediate image insertion
CKEditor 4 logo CKEditor 4
TinyMCE 6 logo TinyMCE 6
TinyMCE 5 logo TinyMCE 5
TinyMCE 4 logo TinyMCE 4

Install Image Embed plugin in CKEditor 4

Download Image Embed
ZIP archive of Image Embed for CKEditor 4

Then do these simple steps:

  1. Copy ImageEmbed directory to ckeditor/plugins/.
  2. Edit CKEditor config and add ImageEmbed to extraPlugins parameter.

All the buttons this plugin will add to your toolbar automatically.

Using config file
Using initialization script

Example of configuring with config.js

If you prefer to edit config.js config file of CKEditor or when your CKEditor initialization code is placed inside some non-editable part of CMS, make these changes there:

CKEDITOR.editorConfig = function(config) {
    config.extraPlugins = "ImageEmbed";
};

Example of configuring inside initialization code

Some CMSs do not use config.js file and let to edit CKEditor initialization script only. Do this changes there:

CKEDITOR.replace("#editor", {
    extraPlugins: "ImageEmbed",
});

Install Image Embed plugin in TinyMCE 6

Download Image Embed
ZIP archive of Image Embed for TinyMCE 6
Self-hosted TinyMCE 6
Cloud TinyMCE 6

Install the plugin to TinyMCE 6 hosted on your server

  1. Copy ImageEmbed directory to tinymce/plugins/.
  2. Edit TinyMCE config and add ImageEmbed to plugins parameter.

All the buttons this plugin will add to your toolbar automatically.

Example

Here you can see sample TinyMCE initialization code with config inside it:

TinyMCE.init({
    selector: "#editor",
    plugins: "ImageEmbed",
});

Refer to TinyMCE add-ons installation manual for more details

Install the plugin to cloud edition of TinyMCE 6

  1. Copy ImageEmbed directory somewhere on your server where it can be accessible by a link.
  2. Specify the location of just copied Image Embed plugin adding key-value pair in external_plugins TinyMCE config parameter.
  3. Edit TinyMCE config and add ImageEmbed to plugins parameter.

All the buttons this plugin will add to your toolbar automatically.

Example

Here you can see sample cloud TinyMCE initialization code with config inside it:

TinyMCE.init({
    selector: "#editor",
    plugins: "ImageEmbed",
    external_plugins: {
        "ImageEmbed": "http://example.com/public/ImageEmbed/plugin.min.js",
    },
});

Refer to TinyMCE add-ons installation manual for more details

Install Image Embed plugin in TinyMCE 5

Download Image Embed
ZIP archive of Image Embed for TinyMCE 5
Self-hosted TinyMCE 5
Cloud TinyMCE 5

Install the plugin to TinyMCE 5 hosted on your server

  1. Copy ImageEmbed directory to tinymce/plugins/.
  2. Edit TinyMCE config and add ImageEmbed to plugins parameter.

All the buttons this plugin will add to your toolbar automatically.

Example

Here you can see sample TinyMCE initialization code with config inside it:

TinyMCE.init({
    selector: "#editor",
    plugins: "ImageEmbed",
});

Refer to TinyMCE add-ons installation manual for more details

Install the plugin to cloud edition of TinyMCE 5

  1. Copy ImageEmbed directory somewhere on your server where it can be accessible by a link.
  2. Specify the location of just copied Image Embed plugin adding key-value pair in external_plugins TinyMCE config parameter.
  3. Edit TinyMCE config and add ImageEmbed to plugins parameter.

All the buttons this plugin will add to your toolbar automatically.

Example

Here you can see sample cloud TinyMCE initialization code with config inside it:

TinyMCE.init({
    selector: "#editor",
    plugins: "ImageEmbed",
    external_plugins: {
        "ImageEmbed": "http://example.com/public/ImageEmbed/plugin.min.js",
    },
});

Refer to TinyMCE add-ons installation manual for more details

Install Image Embed plugin in TinyMCE 4

Download Image Embed
ZIP archive of Image Embed for TinyMCE 4

Then do these simple steps:

  1. Copy ImageEmbed directory to tinymce/plugins/.
  2. Edit TinyMCE config and add ImageEmbed to plugins parameter.

All the buttons this plugin will add to your toolbar automatically.

Example

Here you can see sample TinyMCE initialization code with config inside it:

TinyMCE.init({
    selector: "#editor",
    plugins: "ImageEmbed",
});

Refer to TinyMCE add-ons installation manual for more details

Reviews

Very useful addon. It quickly generates a Base64 encoded version of that image you chose and inserts it in the content.

User icon
Pranav N.
Freelancer

Helps to convert image to Base64 string. It does not send the file to the server to convert.

User icon
Mirek G.
Individual

We needed a tool that converts the image files to Base64 and found this plugin.

We can verify that the plugin is working correctly.

User icon
HÃ¥vard W.
Agency

Tell a friend about Image Embed

Send